Posts

Showing posts from 2011

Mojo Monday Challenge 220

Image
This is just a quick little post as I am getting ready to mail this little guy. The stamp is from http://www.redleadpaperworks.com/ , the papers are Cosmo Cricket (designer) and the black and vanilla are Stampin Up. Embellishments: Brush Christmas Tree and Ribbon by Peeko (vintage). Check out http://www.mojomonday.blogspot.com/ for this weeks challenge.... Merry Christmas!

Tim Holtz 12 Tags Of Christmas Tag 10

Image
The top photo is Tim's tag 10 and the bottom is mine. Every tag has been a challenge and I love learning the new techniques. The challenge was over on the 12th....and today is the 16th and I still have 5 more tags to make. I am very slow....but one of these days soon there will be all 12 displayed here. Check out http://www.timholtz.type.com/ for all the scoop! This particular tag was fun using the foil tape behind the fragments (the Santa pictures). Thanks for looking and if you have any questions please ask! Blessings....

Tim Holtz 12 Tags Of Christmas Tag 3

Image
Wow! The tags that Tim has created sure challenge the creative spark in anyone! This is my version on Tag 3 underneath and Tim's is on top. My tags were made the same....except that on the tag on the right I used various colors of regular Stickles (because I love Stickles)!

Tim Holtz 12 Tags Of Christmas Tag 6

Image
Our Internet was down for a couple of days so I am posting a bit later than I intended. This is from Day 6. It is fun trying new techniques. This is metal foil tape on paper and embossed with Utee. See http://timholtz.typepad.com/my_weblog/2011/12/12-tags-of-christmastag-6.html Tim's tag is first....mine underneath.

Tim Holtz 12-Days Of Christmas 2011 Tag 2

Image
Wow! I love working on Tim Holtz's 12 Tags Of Christmas! He makes it look so easy...and here is me....5 hrs to make one! You can see Tim at work at http://www.timholtz.typepad.com/ . This is Tim's version of Tag 2 with mine beneath it. I didn't have the same supplies that are used by Tim....so I improvised. I did follow the same steps he used.

Tim Holtz 12 Tags Of Christmas 2011 Tag 1

Image
Today is the first day of tim Holtz's Twelve Tags Of Christmas! Check out His website at http://www.timholtz.typepad.com/ . I have been waiting for this to start and have posted my tag here for Day 1. Tim's sample is at the top and mine is underneath. Thanks for taking time to look at my tag!

Holiday Card Boot Camp Day 8

Image
I love this image by Mo Manning! Isn't she precious? I used glossy paper for this and so the image is shiny and alittle hard to see where the light reflects. I haven't used markers alot so this is rather new to me. It was fun to try and I plan to use this technique soon to get a little more practice! I have loved taking these classes and know I will feel really good when I send out these cards this year. The red snow-flakes are by Stampin Up. So is the card stock and ribbon. Try using markers yourself....you may surprise yourself!

Holiday Card Boot Camp Day 4

Image
This card was great fun to make. The background image is from Hero Arts and is stamped on a clear acrylic card. The tree is heat embossed (white embossing powder) on blue cardstock. This is mounted on metalic tape and then adhered to the front of the acrylic card. The bling is assorted sizes and colors of 'jewel's. Check out www.onlinecardclasses.com for great information!

Holiday Card Boot Camp More Of Day 1 Class

Image
Well I am stuck on Day 1 still. But.....what can I say? Wish on a star.....could be a birthday card too!

Holiday Card Boot Camp Day 5

Image
I love taking this class! I don't work as fast as the class goes....but I am motivated and determined to complete the whole class....every project! It is just that I can find numerous ways to use the ideas that are presented in this class! Can you think of some ways to use these ideas?

Holiday Card Boot Camp Day 3

Image
This card is made by stamping with green and then imbossing and inking the background (I used the Big-Shot). Another Christmas Card done! I skipped Day 2....but will come back to that one. Once the ink was dry I used Christmas Red Stickles for the berries.

Holiday Card Bootcamp Day 1

Image
I love taking classes myself.....and have been looking forward to taking this one. Check-out this website! http://www.onlinecardclasses.com This is my version of Day 1.

A Handpainted Candle Tag W/Tattered Pinecone Die Cuts

Image
Happy Sunday! The sun is up.....and the trees are beautiful colors! What a pretty Autumn. I have had to be inside because of a surgery I had.....just now able to be on the computer a little bit. Today I am sharing a tag I handpainted last year.....then added Tim Holtz's new Tattered Pinecomes and Festive Greenery die cuts to the design recently. Don't you love the holidays coming up? I DO!! Blessings.... Lezlie

Christmas in October.....makes me smile!

Image
Hi! I haven't been able to post for a while....so finally! A little tag to share with you. It isn't Christmas yet.....but I usually get started early. Have a great day and thanks for making a stop here! Blessings... Lezlie

GM Challenge #20

Image
Celebrating the products and techniques of Tim Holtz 
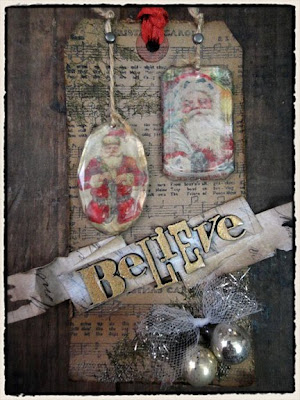
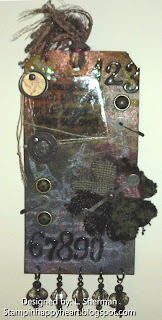
I just love this challenge! This is the tag I made for Grungy Monday 20! The challenge is to use Distress Stickles....so this project has lots of bling. Here are the instructions: Supplies... #8 tag, Distress stain (Walnut), Embossing Powder, Picket fence crackle paint Embossing Folder (Ornaments), Snow Flake Tim Holtz Die,Misc strand of muti-color miniature lights......they are plastic.,Misc Trim ( I got this at the fabric store), Distress Stickles, Tissue Tape, Vintage Lace Ribbon, Organza Ribbon (off-white color), Tim Holtz Stickers ('D', 'E', 'C'), Angel Mist 'Old Paper', Green Mica (large flakes)Mica (small sheet). 1. Color the tag with stain. Let it air dry or heat it. 2. Paint the tag with Crackle Paint slip-slod fashion. Let this dry. 3. Use various colors of Distress Stickles' and spread them out at random here and there. After this is dry you can rub off some of the Stickles.4.

Distressed Snowman Tag

Image
Click the 'title' above to get directions for making this tag Today was a fun day of crafting with a close friend. It is always more fun when someone else is crafting with you! Especially someone who loves crafting as much as you do....

Grungy Monday Challenge #14

Image
Celebrating the techniques of Tim Holtz ! The Challenge this week is based upon a technique from this website. http://timholtz.typepad.com/my_weblog/2008/02/march-technique.html If you like his 'style' you will want to see this website and check-out the creativity coming from here! http://studiol3.blogspot.com/ . Supplies: Stamps: Stampers Anonymous 'Clock' and 'In Dreams' Visual Artistry/'Numbers' by Hampton Arts/Misc. Butterfly/Isaiah 40:31 Stampabilities . Glossy Accents. Sheet Mica. Perfect Pearls powder/Mini-Misters. Perfect Pearls 'Copper'. Acrylic white paint. I didn't have a white Dabber so I dabbed white paint onto the stamp with a sponge. #8 Tag. Vintage Tag, Pins and 'Antique' brads by Stampin Up! Spinner, washers, small brads, and token are by Ideology 'Tim Holtz '. Linen Thread by SU across the tag and various ribbon and fiber (stained with mists) at the top. The flower is cut from various upholstery material wi

SSS113 Sketch Challenge

Image
Supplies: Stamp Set: Birds and Roses by 'Sweet 'N Sassy'. Cardstock is Stampin Up! Sage Shadow, Very Vanilla and Creamy Caramel. The Designer Paper is Curio Carmella by Basicgrey. The ribbon is just a green grosgrain. The leaves are cut from a floral stem by Prima Marketing. Adhesives: Sticky Tape, Dimensionals and Dots by Stampin Up!. The Lace is Crochet Trim 'Victoria' (SU). Flowers are cut from the other side of the Designer Paper Curio Carmella. I used a 'Tim Holtz' Embossing folder (Music) just under the lace trim and below that is a border (Vanilla) cut with a Martha Stewart punch (Fan). I used the large Sizzix Scalloped Circle die for the shape of the card as well as Spellbinders Scalloped Edge and Circle. The Ink is SU Cameo Coral. This challenge is all about a round card! This is my entry for this challenge....believe me I am inspired by this website and I think you will be too. So many creative ideas on http://sweetstopsketches.blogspot.com/ . Take

SSS112 Sketch Challenge

Image
S upplies:Our Daily Bread Designs: 'Serve The Lord' Stamp Set। Crocheted Circle Die.Stampin' Up!: Chalk 'Pastels', Whisper White Cardstock, Vellum , and 'Dimensionals'। Ranger: 'Stickles' Glitter Glue Orange Peel, Baby Blue, Frosted Lace, Scattered Straw. Studio G Glitter Glue Yellow and Green. Stamp image on white cardstock. Run die with stamped image through die machine. I stamped my image two more times and layered one on another (so that is was three high). Use the chalks or water-color crayons to add color where desired. Then I randomly placed glitter-glue just where it was pleasing to my eye. On the stems, flowers, etc. A SU 'Build-a-brad' acrylic clear top exactly fit on top of the 'post-mark' part of the stamped image. The card base was embossed with a 'Tim Holtz' folder after spreading orange litter-glue randomly across the card. Also I used orange, blue and yellow stamp-pads across the middle of the front dragging co

Color Throwdown #144

Image
This week's color challenge was Pumpkin Pie, Certainly Celery and Melon Mambo Stampin Upcolors....or something close to those colors. It really makes for a bright card!Supplies:Cardstock: Stampin Up!Dies: Spellbinders Label 10 and Classic Ovals. Punches: Martha Stewart Daisy Fan Corner and Corner Round.Embossing Folder: Stampin Up 'Lattice'.Ink: Certainly Celery.Adhesive: Sticky Strip and DimensionalsMisc: Diamond and Orange Stickles (Ranger), SU Pretties and Pearls, Green Tulle, SU White Ribbon, Blossoms and Leaves by 'Creative Expressions' (iridescent) and Orange brads (not sure what company).

Tim Holtz Style - Happy Birthday Masculine

Image
I wanted to make a card for a dear family member who is a builder. The 'materials' used here are in the 'Tim Holtz' line. This card was a lot of fun to make. Happy 'Memorial Day' to all..... Directions...see below or ask me please! Thanks for taking time to look at my card! http://www.splitcoaststampers.com/gallery/photo/1983864?&limit=last1 I found this wonderful website that you just have to see! Please take the time....h ttp://studiol3.blogspot.com/ Tim Holtz Products http://www.timholtz.com./products.html And of course....Tim Himself!h ttp://www.timholtz.typepad.com/

PDCC83 Black & White Splash Of Green

Image
Recipe: All Supplies are Stampin Up! unless otherwise noted. DSP: Paisley Petals, Day And Night Card Stock: Basic Black, Whisper White Ribbon: Basic Black 1/4" Grosgrain Dies: 'Classic Squares Small' and 'Lacy Squares' (Spellbinders Nestabilities) Rhinestones: Kaiser Craft (green) Misc: Costume Jewelry Pin (This is pinned to the card and also pop-up dots hold in place. Pop-up Dimensionals are between layers of paper. The text is Vellum (don't know what company) attached to Whisper White square. http://www.theplaydatecafe.blogspot.com/

FM07 Friday Mashup

Image
This week's challenge is for anything feminine....ribbons, pearls, etc. Supplies are: Rose Red Cardstock (SU). The paper is unknown as it was stuck in a drawer for a long time and no company on the back. It is light pink, dark pink and some medium green shades. The largest butterfly is collaged by using Kelly Panocci Valentine Emphemera and then putting it through the Big Shot using an embossing folder. Versamark Ink and Clear Embossing Powder were heated and repeated creating the glossy finish to the large butterfly. Next I attached 'Pretties' pearls and the 'pin' and beads (Stampin Up). The second smaller butterfly is clear embossing ink on vellum with white embossing powder (using heat). Next I antiqued it with pink and green chalk and sprayed a small amount of 'Shimmer' over top. The butterfly small stamp is by Ellen Vener/Village Arts Press. The 'Vintage' stamp is by Hampton Art Stamps. The ribbon is 'Rose Red' by SU. Misc. Supplies: Sti

Happy Mother's Day Card

Image
Just want to say 'Happy Mother's Day to you all....thanks for taking time to stop by here. The instructions are a little late and I apologize for that...but here they are: Cut 'vanilla' card-stock to measure 10 1/2" by 5 1/2". Fold in half to make the card base. Cut a piece of DSP (I used Baha Breeze Patterns by Stampin Up) 5 1/4" by 5 1/4". Use a punch to round the corners on both the card base and the paper piece you just cut. Adhere the paper to the front of the card. This is the first layer. Next I cut a piece of 'vanilla' 5" by 5" and also one 4" by 4". These two pieces are both punched around the corner and edges with the Martha Stewart 'Daisy Fan' punches. Next I used a square die and cut the center out of each one.....to leave a 'window' (2 1/2" by 2 1/2"). Sponge edges with ' Baja Breeze' SU ink. These layers are both attached with pop-up dots. The next layer is a Spellbind

SSS 106 The Sweet Stop Challenge

Image
Supplies: Stamps: Sweet 'N Sassy Stamp Set 'New Creature'Cardstock: Stampin Up: Ballet Blue, Basic Black.DSP: Stampin Up: Pawsitively Prints.Misc Paper: Watercolor (for butterfly and text areas).Ribbon: Stampin Up: Pretty In Pink (do not have the exact name...only color).Dies: Spellbinders: Labels Four and Rose Blossom.Punches: Martha Stewart Deep Edge Daisy Fan and the small and medium Oval punch from SU.Chalk: Stampin Up Blending Pen.Misc: Pop-up Adhesive circles, pink rhinestones and sticky strip. Directions: Attach black and blue layers to blue card base. Attach scallop punchout to back of next layer of DSP mounted on basic black. I attached this next using sticky strip. Next I created another layer of DSP and basic black. The ribbon is attached to the back only but runs around the front of this piece. This layer is attached with dimentionals. Next I cut out the label layers and ovals.The text 'friend' is stamped on before I cut out in order to center it. I att

SSS106 Sweet 'N Sassy 'New Creatures' Scripture Verse

Image
The scripture is from Sweet'N Sassy Stamp set 'New Creature'. Other Products used: Stampin Up Cardstock: Pink Pir., White Textured, Vellum and Bridal Specialty Papers. Also Tim Holtz 'Seasonal'. Ink: SU Soft Suede and Pink Pir. Embellishments: Butterflies are Michaels G brand and Anna Griffin. The Rhinestones are 'Treasures By Shabby Chic'. Brads are SU Antique Brads and Butterfly 'Hot Off The Press'. Misc. Supplies: Smooch spray, Sticky Strip, Embossing White Pearls (Joann's) and a sponge for antiquing. Die Cuts are Kelly Panocci Valentine Emphemera. Tools: Embossing Heat Tool, Sizzix Big Shot, Texture Plate, SU Heart Border and corner punches, Slot punch, SU Elegant Trio Stencils. Directions: Cut Cardstock to make card base 5 1/4 X 5 1/4" (from Pink Card Stock). Fold card in half. Cut next layer from a darker color. I used Tim Holtz antique looking solid paper from the 'Seasonal' paper stack. Cut 5 X 5". Attach using sticky st

Hand-painted Bear W/Heart

Image
This is a little bear I painted on Watercolor paper. I added a little SU DSP and a few buttons along with a greeting.

Just Add Ink JAI 66 Just Add A Flower

Image
This card is using Stampin Up 'Bliss' stamp, Very Vanilla and Rich Razzleberry Card Stock. The Card is hand-painted on water-color paper (by me). The Roses are Very Vanilla from SU and I also used their Scalloped Trim and Border punches. Ribbon is Rich Razzleberry and the embellishment pin is 'Tiny Trinkets'. Any questions please ask and thanks for taking a look!

FM03 Challenge

Image
Supplies : Cardstock: Whisper White, Basic Black. DSP 'Night & Day'. Dies: Spellbinders and Sizzix Circles #2. Adhesive: Sticky Strip, Sticky Pages. Brads: SU Antique Brads. Misc: SU Pretties. Ribbon: 5/8" Whisper White Satin. Punch: 1/2" Circle. Stamp: Warm Words. Tools: Embossing Tool, Needle Tool, Big Shot. Instructions : Cut Cardstock and DSP to desired sizes. Adhere a small piece of Sticky Pages in a squared. You will put it in the Big Shot to cut a circle. If you use the Sizzix Circles #2 die use next to the smallest circle. Pull the 'red' side off of the Sticky Pages circle. Cut a 15" piece of white satin ribbon. At one inch intervals....cut 'slots' in one side of ribbon. Using the uncut side start forming the ribbon around the circle from the outside in. Cut to desired length once your circle is complete. Using a needle tool....heat circle until ribbon changes characteristics. It will melt a little bit but makes a really pretty flower

411 SSC 200

Image
Supplies: Cardstock: Crushed Curry, Not Quite Navy 'Patterns' DSP. Rub-ons: 'Fashion District'.Ribbon: 1/2" Polka Dot Grosgrain 'Crushed Curry'. Punch: 'Scallop Trim Border'.Embellishments: Trinket Key, Corduroy 'Summer Sun' and 'Daffodil Delight' brads.Misc: Sticky Pages, Heat Embossing tool, Sizzix Circle #2. This was fun because I tried a technique I hadn't ever tried before. Did you know that if you use a heat tool you can crumple the ribbon? It works best with satin.....but has some interesting effects on other kinds as well. Can't wait to try it on some other projects. Thanks for the challenge 411! To make a flower : Cut a circle of Sticky Pages (I used the Sizzix Circle die #2...the 2nd smallest). Take the 'red' side off. Cut about a 12" piece of ribbon. Each inch cut a slice about 3/4 of the way across the ribbon leaving one side in-tact. Holding the cut side out....start circling the sticky piece from th

Mojo Monday Challenge Card 186

Image
Supplies Cardstock: Stampin Up! So Saffron, Baja Breeze, Black,Whisper White, DSP Baja Breeze PatternsInk: Classic Black. Ribbon: Gold Elastic (Stampin Up!) Black Woven (BasicBasic Brand).Stamps: 'Sweet Of You' and 'Punch Bunch'. Misc: Bleach, small white tag, Tulle Flower (Recollections Fleur from Michaels), Tim Holtz Texture Embossing Folder (Post Card). The Shabby Chic card is made using the following: Stamp: Grand Adventures Ink: Stampin Up!: Sahara Sand Paper: Stampin Up! Very Vanilla, Sahara Sand, Spotted Canary (Julianne) Embellishments: Flower is 'Recollections' Boutique Fleur, Darice Self Stick Pearls, a piece of old jewelry. Ribbon: Kiwi Kiss Satin (Stampin Up!) Dies: Sizzix 'Texture' Plate 'Eyelets' and Spellbinders Nestabilities 'Labels'. Punch: Stampin' Up! Border. The stitching is Vanilla colored embroidery floss. Thanks for taking a look.....This card was fun. I used Sahara Sand ink to give it an antique look here an

Stamping 411 Challenge SSC 198

Image
This week's challenge was fun for me but you wouldn't believe how many times I stopped and started again. I just couldn't get the creative part of my brain going on this. The sketch was great and not complicated....which just goes to show you that I can make things harder than they are! Supplies are: Cardstock is Stampin Up Always Artichoke and Pretty In Pink. Designer Paper is Always Artichoke Patterns. Ink: Always Artichoke. Punches: Trio Flower, 1" Circle, Small Oval, Medium Oval and the Fancy Flower Punches. Stamps: 'Vintage Labels' and Jumbo Roller 'So Swirly'. Embellishments: Basic Jumbo Grommets and 'Pretties'. Ribbon: 'Theater' and 1/2 " 'Pretty In Pink' Grosgrain. Misc: Crystal Effects. Sizzix Die 'Little Leaves'.

Mojo Monday Contest 185

Image
It is Monday again and am trying to get my card sample in earlier than I usually do. I love using red, vanilla and black together. Thanks for stopping by! The products used are Stampin' Up except for the Tim Holtz 'Tissue Tape at the top of the card. Any questions please ask. I will reply.