Posts

Holiday Card Workshop 2021

Image
  If you like taking card classes you should try https://www.onlinecardclasses.com/shop/ This week I am doing that and this is my card #1 from Day 1. Thanks for stopping by!!

Altenew Watercolors

Image
These Cards are the result of another day of Altenew Academy Watercolor class. These classes are motivational and fun!  The cards are partially stamped and partially painted. Here is a link to the class:   https://altenewacademy.com/product/watercolor-basics-beyond-featuring-altenew-watercolor-pan-set/ The cards are A2 size.  I used Strathmore watercolor paper, Nina Solar White Cardstock and the black cardstock is something I had in my stash of supplies and I am not sure of the maker. My watercolors are Altenew   https://altenew.com/products/watercolor-36-pan-set
Image
It has been a very long time since I have been able to blog. In short....it is because of health reasons. Since I am feeling much better...now seems a good time for me to start blogging again. I still love taking classes and do take them quite often. This way I can keep on top of current trends and learn about new products. Altenew Academy offers classes that I think are well worth the time. www.altenewacademy.com Their products are high quality or you can easily use supplies that you already have in order to complete a project Like this. This card is made using a watercolor background and stencil. Supplies: 140 lb Watercolor Paper (I used Strathmore) Altenew Watercolor Set Prima Stencil Anna Griffin Die Darice Foam Strips Heartfelt Creations handmade flower Poinsettia Various small frosted greenery pieces Liquid glue Hot glue Glimmer Pen

One Line Focal Point Card

Image
This type of card is not my usual style.  I am taking a class that encourages working outside of the box.  The large focal point is the flower.  I used misc. buttons, beads, sequins and ink along with the flower to create my 'line'.  This 'Thank You' card is going to my sister.  She sent me a lovely gift for a suprise. The Supplies: A paper flower using Heartfelt Creations stamp and colored with Viva Color. Miscellaneous button, sequins, metal pieces.....just anything you have. PPA Perfect Paper Adhesive Matte. Thread for tag.....but you could also incorporate thread throughout. Heidi Swapp Color Shine Have some fun with this!!  I did.....and there are no real rules!

Some Christmas Cards!

Image
Christmas is a wonderful time of the year....especially if you are a crafter!  I have been making cards lately and haven't been good about posting them on my blog. Blessings to all......and happy crafting!

www.onlinecardclasses.com/Stretch Your Stamps Day 9

Image
This technique was taught at www.Onlinecardclasses.com.  I loved being able to have freedom in The design of this card.  It is so much fun to use stamps where an image is built by layers.  This is one of those cards.  After I stamped the flowers and leaves I put shimmer on them with a glitter pen and really liked the effect.  Glitter card stock was used on the left side of the card. I love taking classes from the teachers here.....and always learn something new.

Using Alphabet Letters Out Of The Box Day 4 SYS

Image
This post was one out of the box for me.  I love taking 'Online Card Classes' from www.Onlinecardclasses.com.  Currently the class is 'Stretch Your Stamps'.  This particular post is using alphabet letters from Day 4.  

Happy 4th Of July

Image
I love my country so there is always a place for a patriotic card. 1.  The card base is made from paper by Authentique.  I cut a card base 6" by 12".  Next score and fold in      half. 2.  Cut top layer of paper 5 3/4" X 5 3/4". 3.  Distress the edges with sharp scissors and curl up the top right paper corner. 4.  Die cut the flag and the stars with Movers and Shapers 'Old Glory' die (Tim Holtz). 5.  Sponge Versamark over the top of a scrap flag covering the 'stripes' part.  Sprinkle with white      embossing powder and heat using heat gun. 6.  Attach the 'good' flag and attach with 'mini' pop dots. 7.  Use hot glue to attach the paper flowers (by Spare Parts). 8.  Glue down the stars using 'Glossy Accents' by Ranger. 9.  Attach a metal circle or gem to the top of the stars. 10.The 'A Celebration of Liberty' sticker is by Authentique. Any questions please ask! Blessings to your da...

Patriotic Celebration Card

Image
This card was fun to make and I loved making it.  The Stamp set is from Stampin Up! 'Happy Fourth'.  It is an older one but a good one!  The star punch is also Stampin Up!.  I used Versamark ink and white embossing powder.  The paper is from Authentic.  I love how versatile the paper is and it is very strong so you can shape it....and it doesn't usually tear.  Also the 'Red/White/Blue', red stripe and 'Let Freedom Ring' Stickers are by Authentique as well.  Flowers are paper and by Recollections (Michaels brand).  I made the Rosette from SU DSP and used Tim Holtz Sizzix strip die.  Also the ribbon is from the Tim Holtz collection.  I used misc. crystal stars, circles and flourishes here and there.   1.  Cut card-base paper 6" X 12".  Score and fold in half.  Corner punch all four corners. 2.  Cut top layer of paper 5 3/4" X 5 3/4". Round corners.  Add ribbon here if desired and tape along back ...

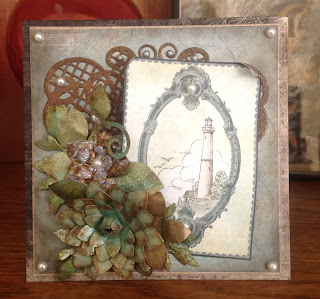
Lighthouse Card

Image
It has been a while since I have posted to my blog.  Now that I am catching up....have you seen all of the new products that have come out on the market?  Well....I probably haven't seen them all....but I try to read as much as I can and take classes to keep on top of things.  I recently took at class using Viva Decor 3-D Stamp Paint.  I love experimenting with this product.   Also I have been using the stamps/dies from Heartfelt Creations (I became a Member).  The products are wonderful and very classy in my opinion.  If you would like to check out their Website it is  http://www.heartfeltcreations.us/gallery.php?view=cards    This is a link to their card Gallery.  There is also a Scrapbook gallery and an Altered Art gallery. The paper used on this card is from their 'Balmy Breeze' collection.  I used the Decorative Lattice and Decorative Flower dies (Spellbinders).  The flowers are are cut from the Open Vintage Floret ...

Stampin' Up! Christmas Ornament

Image
  I saw a video by Linda Heller on how to make this ornament.  In case you haven't seen it...this is the link!  http://lindastamps.wordpress.com/2012/08/07/holiday-catalog-ornament-2-videos/?utm    I added a pearl and tassle at the bottom.  This project takes time but is well worth the end result.   Any time I receive an ornament....when I place it on the tree the next year I always think of the person who gave it to me.  Who can you give an ornament to this year? Blessings....

MOJO 267 Challenge

Image
Sometimes it takes a challenge to motivate me into getting started with my cards and I sure do like the challenges here http://mojomonday.blogspot.com/2012/11/mojo-monday-267.html  . This card has a mixture of Stampin'up papers, Michaels ribbon, some antique glass balls, gold elastic, a Michael's chipboard snowflake, SU embossing powder, Diamond Dust and Rubber Cafe Crystals. Thanks for taking the time to look at my project!  Any questions please ask!

Holiday Card Workshop Day 4

Image
This card is from Day 4 'Online Card Classes' Holiday Workshop.  So all I can say is that sometimes my class projects are out of order on my blog because I make the cards when I am moved to be creative and....I am never sure what is going to strike me on any particular day.  This card was fun to make but I know I need more practice with my Copic Markers!  Practice makes perfect as they say.  Who is 'they' by the way?  If you aren't familiar with the markers they are alcohol based.  The workshop can be found at www.onlinecardclasses.com  Holiday Card Workshop.  The artist that demonstrated how to make the card is Sandy Allnock Supplies: Stamp:  Stampendous (Santa) and Stampin Up 'Be Merry'. Copic Markers:  Light Gray, Dark Gray, Red, Green, Navy, Light Blue. Cardstock:  Gumball Green and Whisper White (Stampin' Up). Punch:  Corner Chomper Ink:  Stazon Black and Distress Vintage Photo. Glitter:...

Holiday Card Workshop Day 1

Image
    This class started on Monday....and as usual I am a little behind.  At any rate here is my first assignment or at least part of it.  The card is 3" X 3" and the envelope to fit is Stampin' Up.  Yes....I could make my own but since I was running slow....I decided to just stamp the front of a small envelope.  The teacher for this assignment is Kristina Werner.....and we website is www.onlinecardclasses.com (Holiday Workshop Day 1).  This is a great on-line class resource and since you always have access to past class information and videos....I will keep taking more and more classes!   This is a simple card.... Card base is 3" X 6" Whisper White Cardstock (Stampin Up!). Next I chose a patterned paper and cut the first layer 2 3/4" X 2 3/4".  The third layer is the stamped image layer.  This is 2 1/2" X 2 1/2".  Next I stamped the image with Stazon black ink.  The color is Copic Markers.  These are attached ...

Heartfelt Creations 'Peace' Christmas Card

Image
With October almost over I am more and more aware that I need to work on my Christmas Cards!  I saw this one on the 'Heartfelt Creations' Website at http://www.heartfeltcreations.us/gallery.php?project=1595&product=2827  created by Kristina King.  She is one of the very talented artists showcased in the 'gallery'. This picture is the card that I made but you can see Kristina's at the above link.   My supply list is slightly varied from hers and is listed below. Supplies: Heartfelt Creations: Holiday Dove, Dove Of Peace, Snowy Winter Paper:  Stampin Up': Brushed Silver, Whisper White, Midnight Muse Ink:  Stampin Up':; Whisper White Craft Ink; Stazon: Black; Distress: Clear Embossing Chalk:  Pan Pastels Embossing Powder:  Ranger: Silver, White Ribbon:  Celebrate It (From Michaels) Silver or White. Embellishments:  Misc. Bling Adhesive:  Pop-up Dots and Double-sided Tape Misc:...
Image
I saw a card like this on the internet at some point and have to give the credit to Sharon Field at www.createdbyu.blogspot.com (who is a Stampin Up Creative Coach).  Check out her website for inspiration.  You will love it.   My card isn't exactly like hers but the style is very close..... Supplies: Paper:  Stampin Up 'Whisper White', 'Old Olive', 'Real Read', Water Color Paper Stamps:  More Merry Messages and Kidoodles Ink:  Black Stazon Chalk:  Stampin Up Embelishments:  Rubber Cafe 'Red' Jellies and Stampin Up Red Polka-dot Ribbon Adhesive:  Rubber Cafe Double-sided tape and Scrap Happy Sheer Glue, Dimensionals (SU), Pop-up Dots (SU). Misc: Paper Cutter, Big Shot, Embossing Folder 'Holly' by Sizzix,Postage Stamp Punch from Stampin Up, Blender Pen (SU). Steps:    1.  Cut a card base that folds to 4 1/4" X 5 1/2" using Whisper White.   2.  Cut card front to emboss 4" X 5 1/...

'All Things Tim' Christmas Patchwork Swatches

Image
These are pictures are of the swatches I sent in to our Host 'Mom' from my 'All Things Tim' group. If you are much of a crafter I am sure you have heart of Tim Holtz.  He is an amazing artist and also a Designer for Ranger Inc.  If you care to look...check out www.timholtz.com  and you will be amazed. Currently I am part of this swap where you are assigned a certain size of a piece of a patchwork.  We were assigned 27 pieces....and mine was 2" X 3".  Finally I am done....and soon I will receive all of the other pieces and assemble them into a 12" X 12" work of art.  Maybe I should say....works of art.  How amazing to get mini masterpieces from all over the world and be able to look at it every year for many years to come.  I don't enter many swaps but this one is one I could not pass up.  Supplies I used: Grungepaper Embossing folder (Tim Holtz - Alterations Brick Wall) Gesso Watercolor Paper Stazon Ink (Black)...
Image
Tim Holtz is an inspiring artist and I love following the 12 tags of 2012.  It was a bit disappointing that He decided not to have the 12 tags of Christmas this year....but I am thinking I can adapt a Christmas theme to the monthly tag techniques offered January through December.  This is my version of August 2012.  You can view Tim's blog at http://www.timholtz.com/category/12-tags-of-2012/
Image
I have been taking a class on Mixed Media and I love it....unfortunately I am very slow at it.  There is a bit of stamping on this project but it is mostly paint, artist spackle, india ink, chalk and gel medium.  This is very different than the usual work I do.....and I am glad that I tried it.  Also I used Tim Holtz digital pictures and several of his stamps.  I used pan pastels and inca gold on various stencils.  The little girl in the picture is my Mother when she was young.  It was fun to incorporate a family picture with the art.  Also the date on the project says March 31st....but my camera is not displaying the correct date.  It is always something!  Thanks for stopping by to look at my project!  Why don't you try something you haven't done before?  You may like it!
Image
It has been a while since I posted anything.....a few health issues but I am getting back in the swing of things now.  Certainly I am inspired by the very gifted artists I follow on the internet..... There are blogs and other wehsites that encourage Artistic Journaling.....so I am trying to finish the journal I started over three years ago.  I know that sounds like a long time and probably is to most....but the theme of it is 'My Favorite Things'.  I have many 'favorite things' to share....and the inspiration comes when it comes.  So.....I just want to share the cover and some of the pages I have completed so far.  I have almost all of the pages at least started.....and usually projects go much faster for me than this!  I have had a mental block on this one for some reason.  I think if I blog about it maybe it will motivate me to finish it for good!  Thanks for taking time to look.  The book is one I boug...