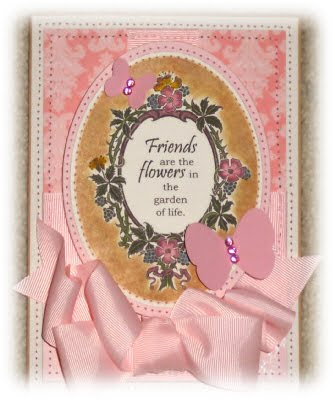
Diecutting With Spellbinders 101

It is fun to take classes now and then to keep my skills up or to learn a new technique or two.
This month I am taking the 'Die-cutting with Spellbinders 101, class with Catherine Scanion at http://www.mycreativeclassroom.com/ . This card is entered in two challenges this week....to see some other beautiful ideas see http://casestudychallenge.blogspot.com/ and http://ourcreativecorner6.blogspot.com/
This month I am taking the 'Die-cutting with Spellbinders 101, class with Catherine Scanion at http://www.mycreativeclassroom.com/ . This card is entered in two challenges this week....to see some other beautiful ideas see http://casestudychallenge.blogspot.com/ and http://ourcreativecorner6.blogspot.com/
I used the largest of the small 'Oval' die set....and the second of smallest of the Grande set for the focal point. The graphic is a download from the class. I sprayed this with workable fixative then cut out a duplicate of the graphic onto vellum and cut out close to the edges of the image. This is held over the top of the base and then with a cotton ball and tweezers I inked over the top with 'Soft Suede' ink by Stampin Up! This is done while the small oval is still around the image. When removed from the die this leaves the white edge to contrast the ink. Once this dried I sprayed over the top with a permanent fixative. The cardstock is Pink Pirouette, White, Soft Suede Textured and Rasberry Tart DSP all Stampin Up! The ribbon is also Pink Pirouette. The adhesive is Glossy Accents, Sticky Strip, Glue Dots and Pop-Up Dots. I'm glad you took time to look at my card! Any questions please ask.


Comments
(If you could please next time link back to CASE Study and indicate that you're playing with us. Thanks!)
(I would also appreciate a shout out indicating you are entering your card in our weekly challenge, thanks!)
Thank you for playing along with us @ OCC